Slow In & Slow Out
The name for this principle comes from having the object or character "slow out" of one pose and "slow in" to the next pose. This is because the human body, and almost all other objects, need time to accelerate and slow down. Rather than having a uniform velocity for an object, it is more appealing, and usually more realistic, to have the velocity vary at the extremes. Therefore, animation that has more key frames near the beginning and end of an action can look more realistic. This emphasises the extreme poses, and having fewer key frames in the middle creates acceleration. This principle mainly applies to characters being moved between two extreme poses, such as sitting down and standing up, but also to animated objects. For example, a bouncing ball moves faster as it approaches or leaves the ground, and slower as it approaches or leaves its peak position (as shown below in a diagram from http://www.just-animate.com/?cat=3, which also demonstrates the Arcs principle discussed below).

An example of the Slow In & Slow Out principle in classic animation is Cinderella, released by Disney in 1950. The principle applies to almost every movement in the film. Below is a particular example; between 0:18 and 0:22 seconds, as the Fairy Godmother waves her wand in arcs, we can see it slows in and slows out, creating realistic acceleration.
An example of the Slow In & Slow Out principle in contemporary animation is Waking Life, a 2001 rotoscoped film by Richard Linklater. From 0:39 to 0:43 seconds in the clip below, we can see that the woman's arm accelerates then slows to land. Then her head turns slowly to begin with, speeds up in the middle of the movement, then slows to a stop, demonstrating slow in and slow out, and showing the principle is still relevant today. Interestingly, as Waking Life is rotoscoped, it also proves that the principle of slow in and slow out applies to real life.
Arcs
This principle is about motion paths. Almost all movement in the natural world describes curved, arced trajectories in space - not straight ones, which are more characteristic of mechanical movement (for example, pistons in cylinders move straight up and down). Examples of arcs in everyday life include a ball being thrown across a room; as gravity begins to act on it, it is pulled down towards the earth in an arc, rather than straight down (as shown in the first diagram of the Slow In & Slow Out article above).
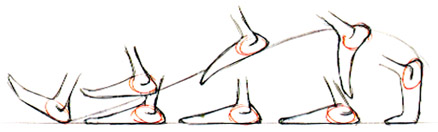
Using properly arced paths results in more life-like motion. Audiences realise something is not right in an animation when a head turn follows a straight horizontal line, even if they do not know that in real life a head will dip or raise slightly when turning. Arced paths can be used for everything, from arms and legs to head turns and eye movement, as almost all human joints require rotation through an arc to move. For example, the motion path of feet when we walk (as shown below in a diagram from The Animator's Survival Kit by Richard Williams).
An example of arcs used in a classic animation is in Aardman's 1989 stop motion short, Ident. Within the first twenty seconds, the main character moves his head in an arc, wipes the mirror with his hands moving in arcs, steps forward in an arc, and so on, despite the geometric style throughout the film.
An example of arcs used in a contemporary animation is in Chris Landreth's 2004 CGI film, Ryan. From 0:28 seconds onwards in the clip below, we see the character turn round then turn his head in a continuos arc that changes direction, and then nod in an arc, showing a refined use of the principle of arcs.
Straight Ahead & Pose to Pose
It is considered that there are three ways to animate;
1. Straight Ahead: This is when an animator simply starts to animate, one frame after the other. This allows spontaneity and creativity. However, proportion can be easily lost, timing can be inaccurate, and the point of the action can be lost. It is sometimes the only option, as for stop motion and sand or paint on glass animations etc, it is not plausible or practical to animate in any other way. Proportion is not usually lost in CG or stop motion when this method is used, but timing can be weakened without enough tests.
2. Pose to Pose: This method means drawing the key positions in a movement beforehand, then going back to create the inbetweens. For example, drawing the strides and passing positions of a walk cycle first, then going back and creating inbetweens. This does not allow spontaneity, and it can be difficult to match the next key frame you're aiming for. However, it means proportion and timing are kept, and is efficient in the workplace as it is easy for other animators to help by creating the inbetweens.
3. "The Best Method": Termed by Richard Williams, this method is a combination of the two, and is the most commonly used method in CG and 2D animations today. It requires planning the motion in rough as thumbnails, then creating the "contact drawings" (key frames that are essential to the movement), then doing several straight ahead tests before animating using pose to pose. This means spontaneous ideas can be included, and secondary actions such as a scarf in the wind can be added afterwards, using either method, once the essential movements and timing are correct.
An example of Straight Ahead & Pose to Pose in classic animation is Wladyslaw Starewicz's 1930 stop motion film, The Tale of the Fox. Animating puppets, Wladyslaw Starewicz would have had to use straight ahead animation. Using pose to pose would have required guesswork without the technology of onionskins, and resulted in very jerky movements.
An example of Straight Ahead & Pose to Pose in contemporary animation is in my own work. As it is drawn as opposed to stop motion, I had the choice of straight ahead, pose to pose, or both; I chose to combine both. The girl character was animated using pose to pose animation, whereas the sun was animated using straight ahead, so it changes form quite often. However, I drew the outline of the sun by drawing round an object each time, which helped it stay the same size, but not in the same position. The balloon was animated using straight ahead, because that is the logical choice for stop motion animation.
